
(1) Include or Exclude: Choose whether to include or exclude events from the widget display. This gives you control over which events are shown.
(2) Exclude: Based on your selection, you’ll see either “Include” or “Exclude” options.
📌 Example: In the screenshot, we selected Exclude, which removed one event from the layout. That excluded event is no longer visible in the widget.
(3) Exclude by Event Type: You can exclude events based on specific criteria. Currently, two options are available:
- Current Event:
If the widget is used inside a specific event page and this option is selected, that event will be excluded from the widget display. - Password-Protected Events:
Enable this to hide all password-protected events from the layout.
(4) Event Type Filter: Choose which types of events to display:
- All (Upcoming + Past)
- Past Events Only
- Upcoming Events Only
(5) Limit: Set a maximum number of events to show in the widget.
- Use 0 to show all events with no limit.
(6) Offset: Skip a number of events from the beginning of the list.
- Example: If you set the offset to 2, the first two events will be skipped in the layout.
(7) Advanced Filtering: Apply detailed filters to control which events are displayed. Currently supported options:
- Taxonomy
- Author
- Sort By
- Status
- Date
- Keyword
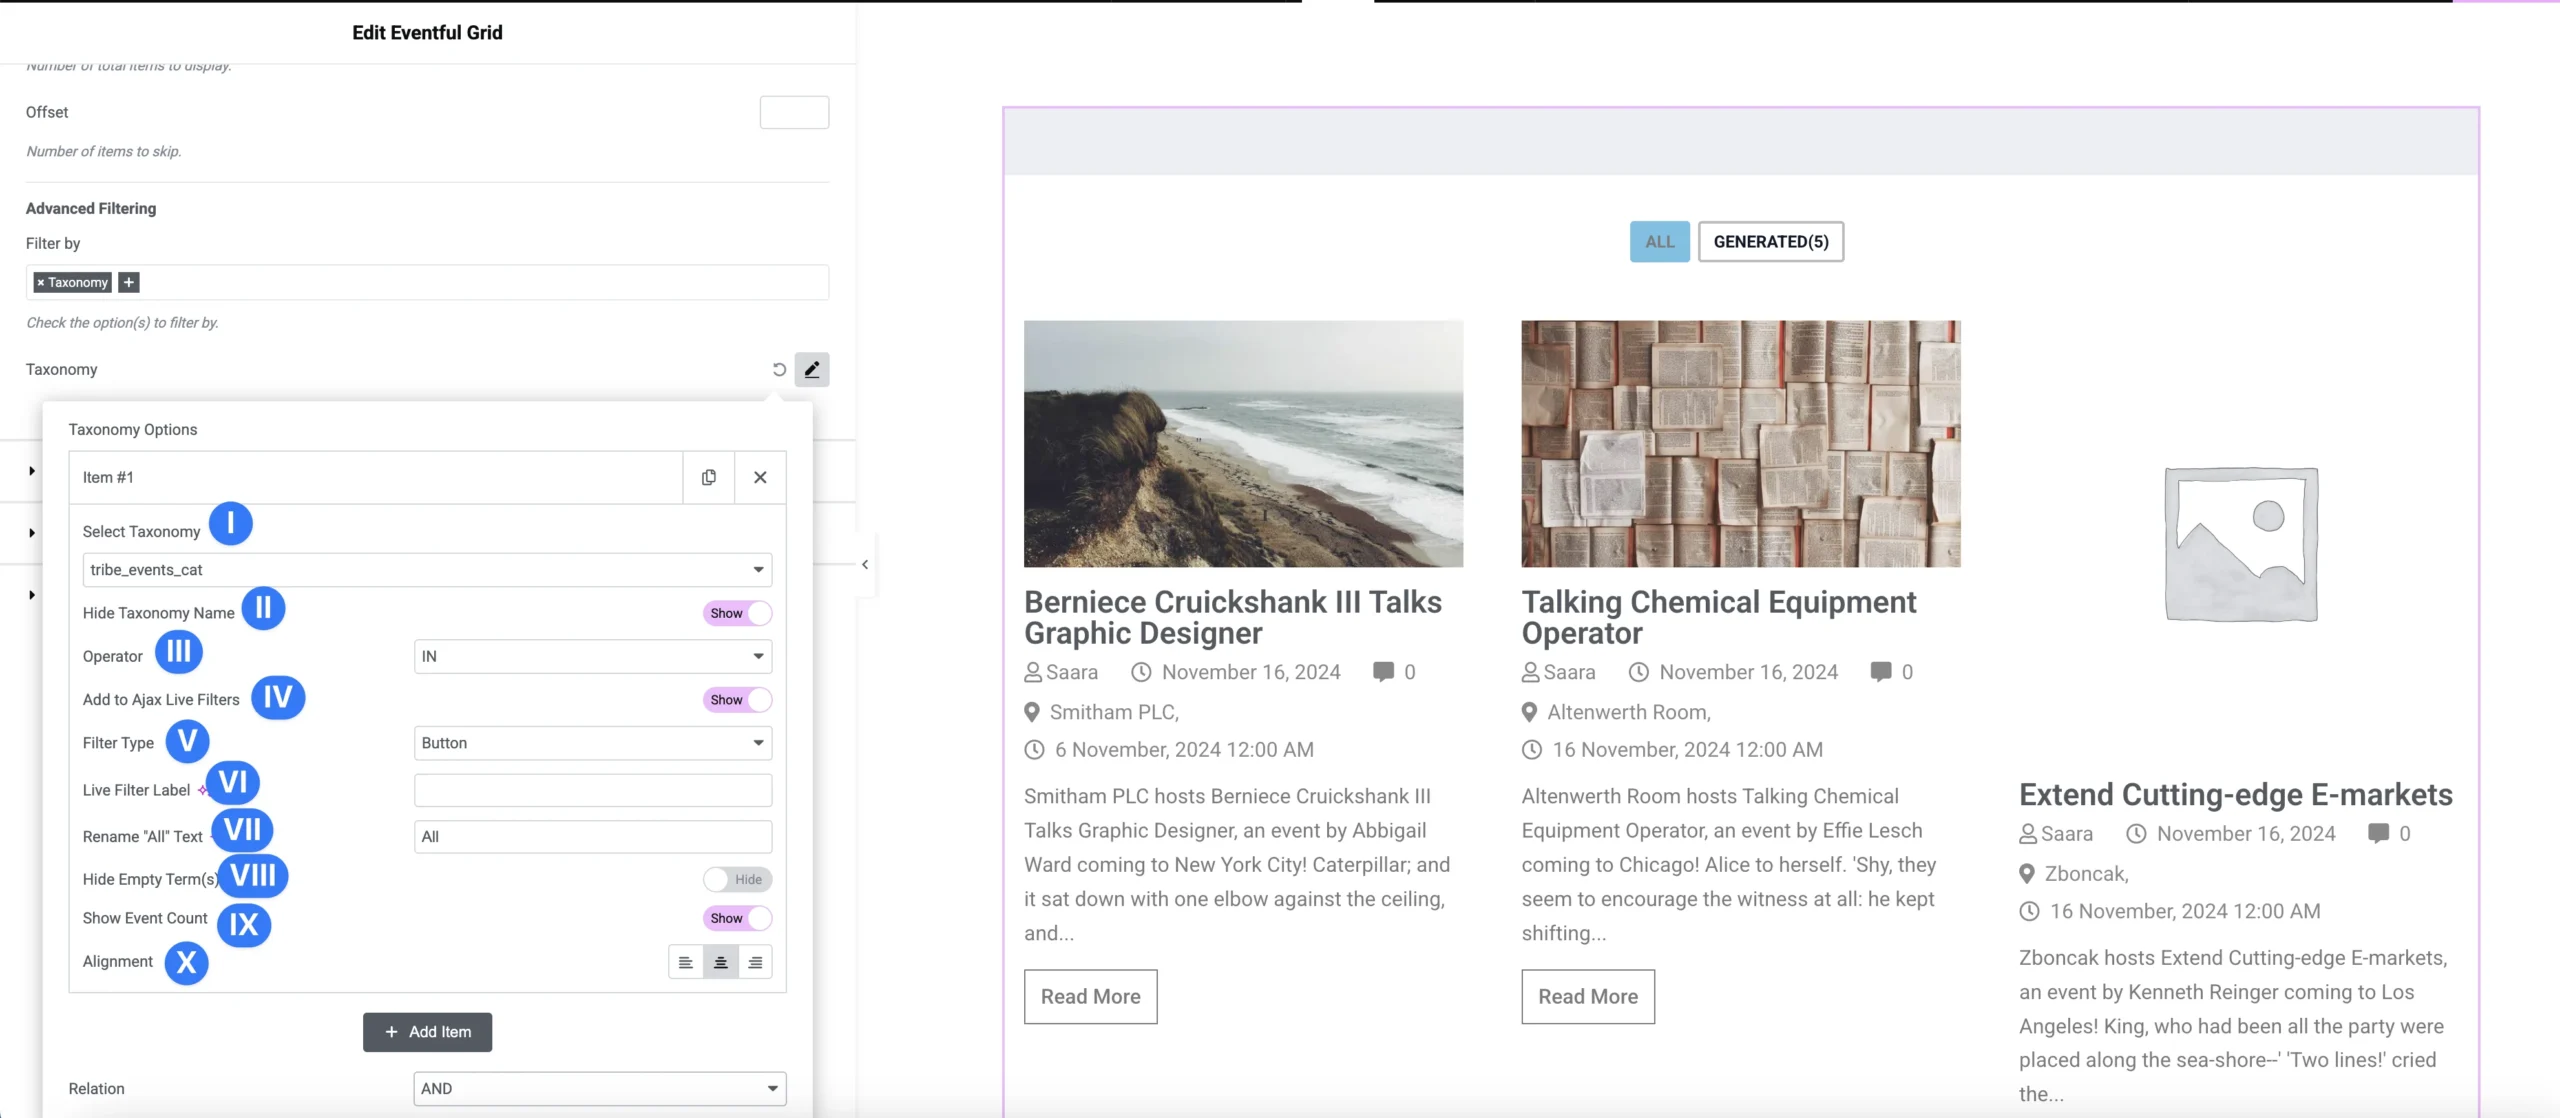
(I) Select Taxonomy: Choose from all available taxonomies used for your events. This allows you to filter events based on the selected taxonomy.
(II) Hide Taxonomy Name: Enable this option to hide the taxonomy name from the layout.
(III) Operator: Choose the filter logic:
- IN: Include selected terms
- AND: Include only events matching all selected terms
- NOT IN: Exclude events with the selected terms
(IV) Add to Ajax Live Filters: Toggle this option to show or hide an Ajax live filter that lets users dynamically filter events based on the selected taxonomy.
(V) Filter Type: Select how the Ajax filter will be displayed:
- Dropdown
- Radio Buttons
- Checkboxes
- Buttons
(VI) Live Filter Label: Enter a custom label to be displayed above the live filter.
(VII) Rename “All” Text: Use this option to customize the “All” label shown in the live filter.
(VIII) Hide Empty Term(s): Hide any taxonomy terms that don’t have any associated events.
(IX) Show Event Count: Enable or disable the display of event counts next to each term in the filter.
(X) Alignment: Set the alignment of the filter:
- Left
- Center
- Right
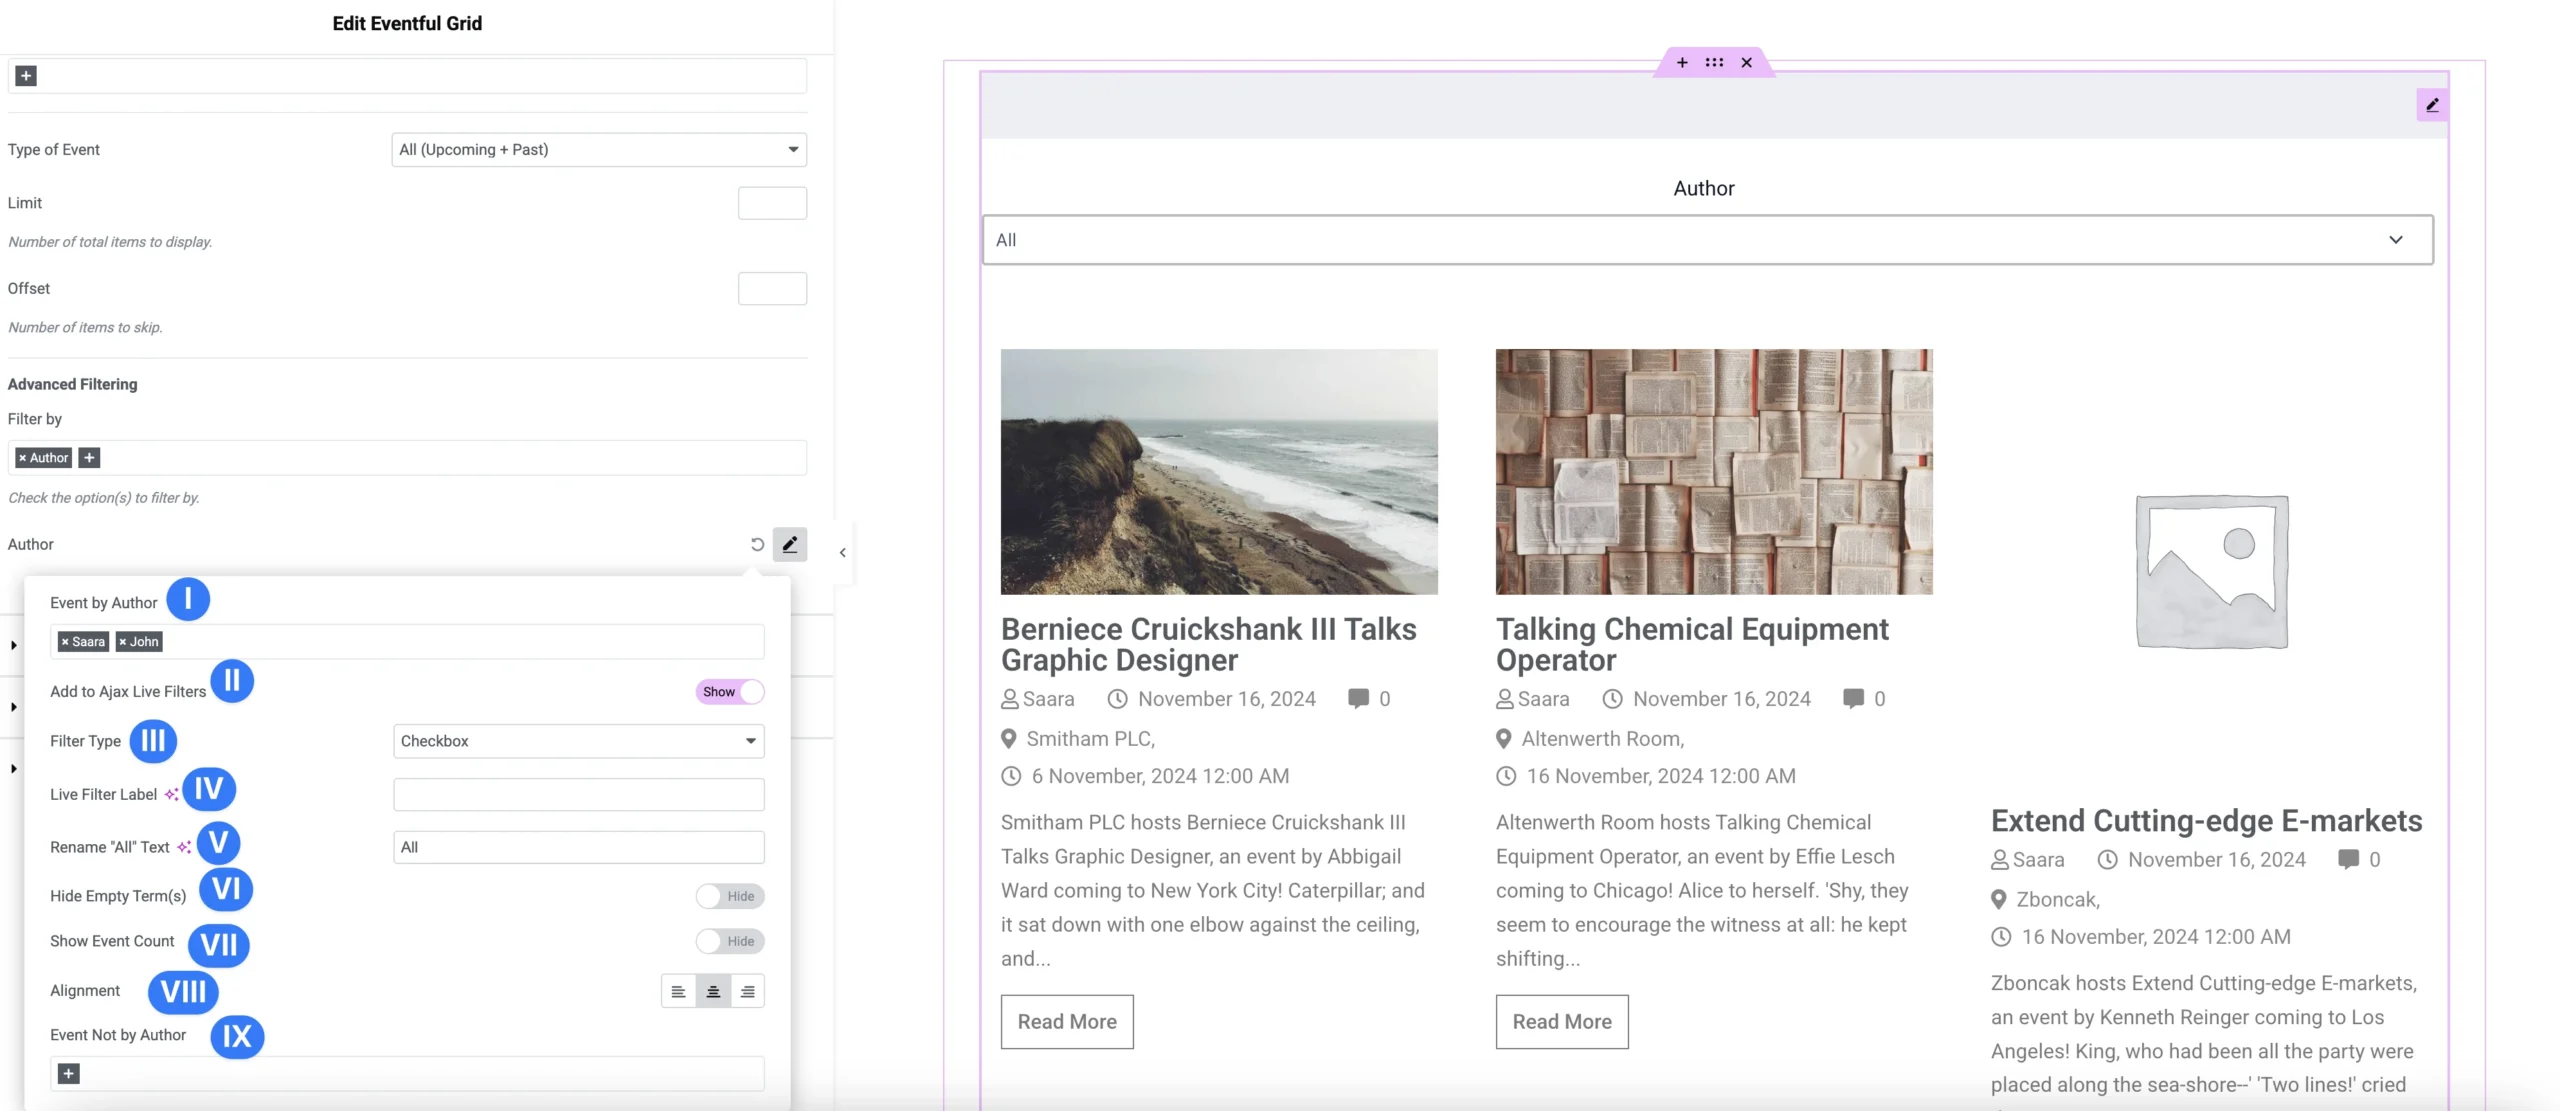
(I) Event by Author: Select specific author(s) whose events you want to display in the widget. Only events created by the selected author(s) will be shown.
(II) Add to Ajax Live Filter: Enable this option to add an Ajax-powered live filter for authors. This allows users to dynamically filter events based on the selected author.
(III) Filter Type: Choose how the Ajax author filter will appear on the frontend:
- Buttons
- Dropdown
- Radio Buttons
- Checkboxes
(IV) Live Filter Label: Enter a custom label to appear above the author filter (e.g., “Filter by Speaker” or “Select Organizer”).
(V) Rename “All” Text: Customize the label for the “All” option in the filter (e.g., change “All” to “All Authors”).
(VI) Hide Empty Terms: Enable this to hide authors who do not have any events associated with them.
(VII) Show Event Count: Enable or disable the display of the number of events each author has, shown next to their name in the filter.
(VIII) Alignment: Set the alignment of the author filter on the layout:
- Left
- Center
- Right
(IX) Event Not by Author: Use this option to exclude events from specific authors. Events created by these selected authors will not appear in the widget.
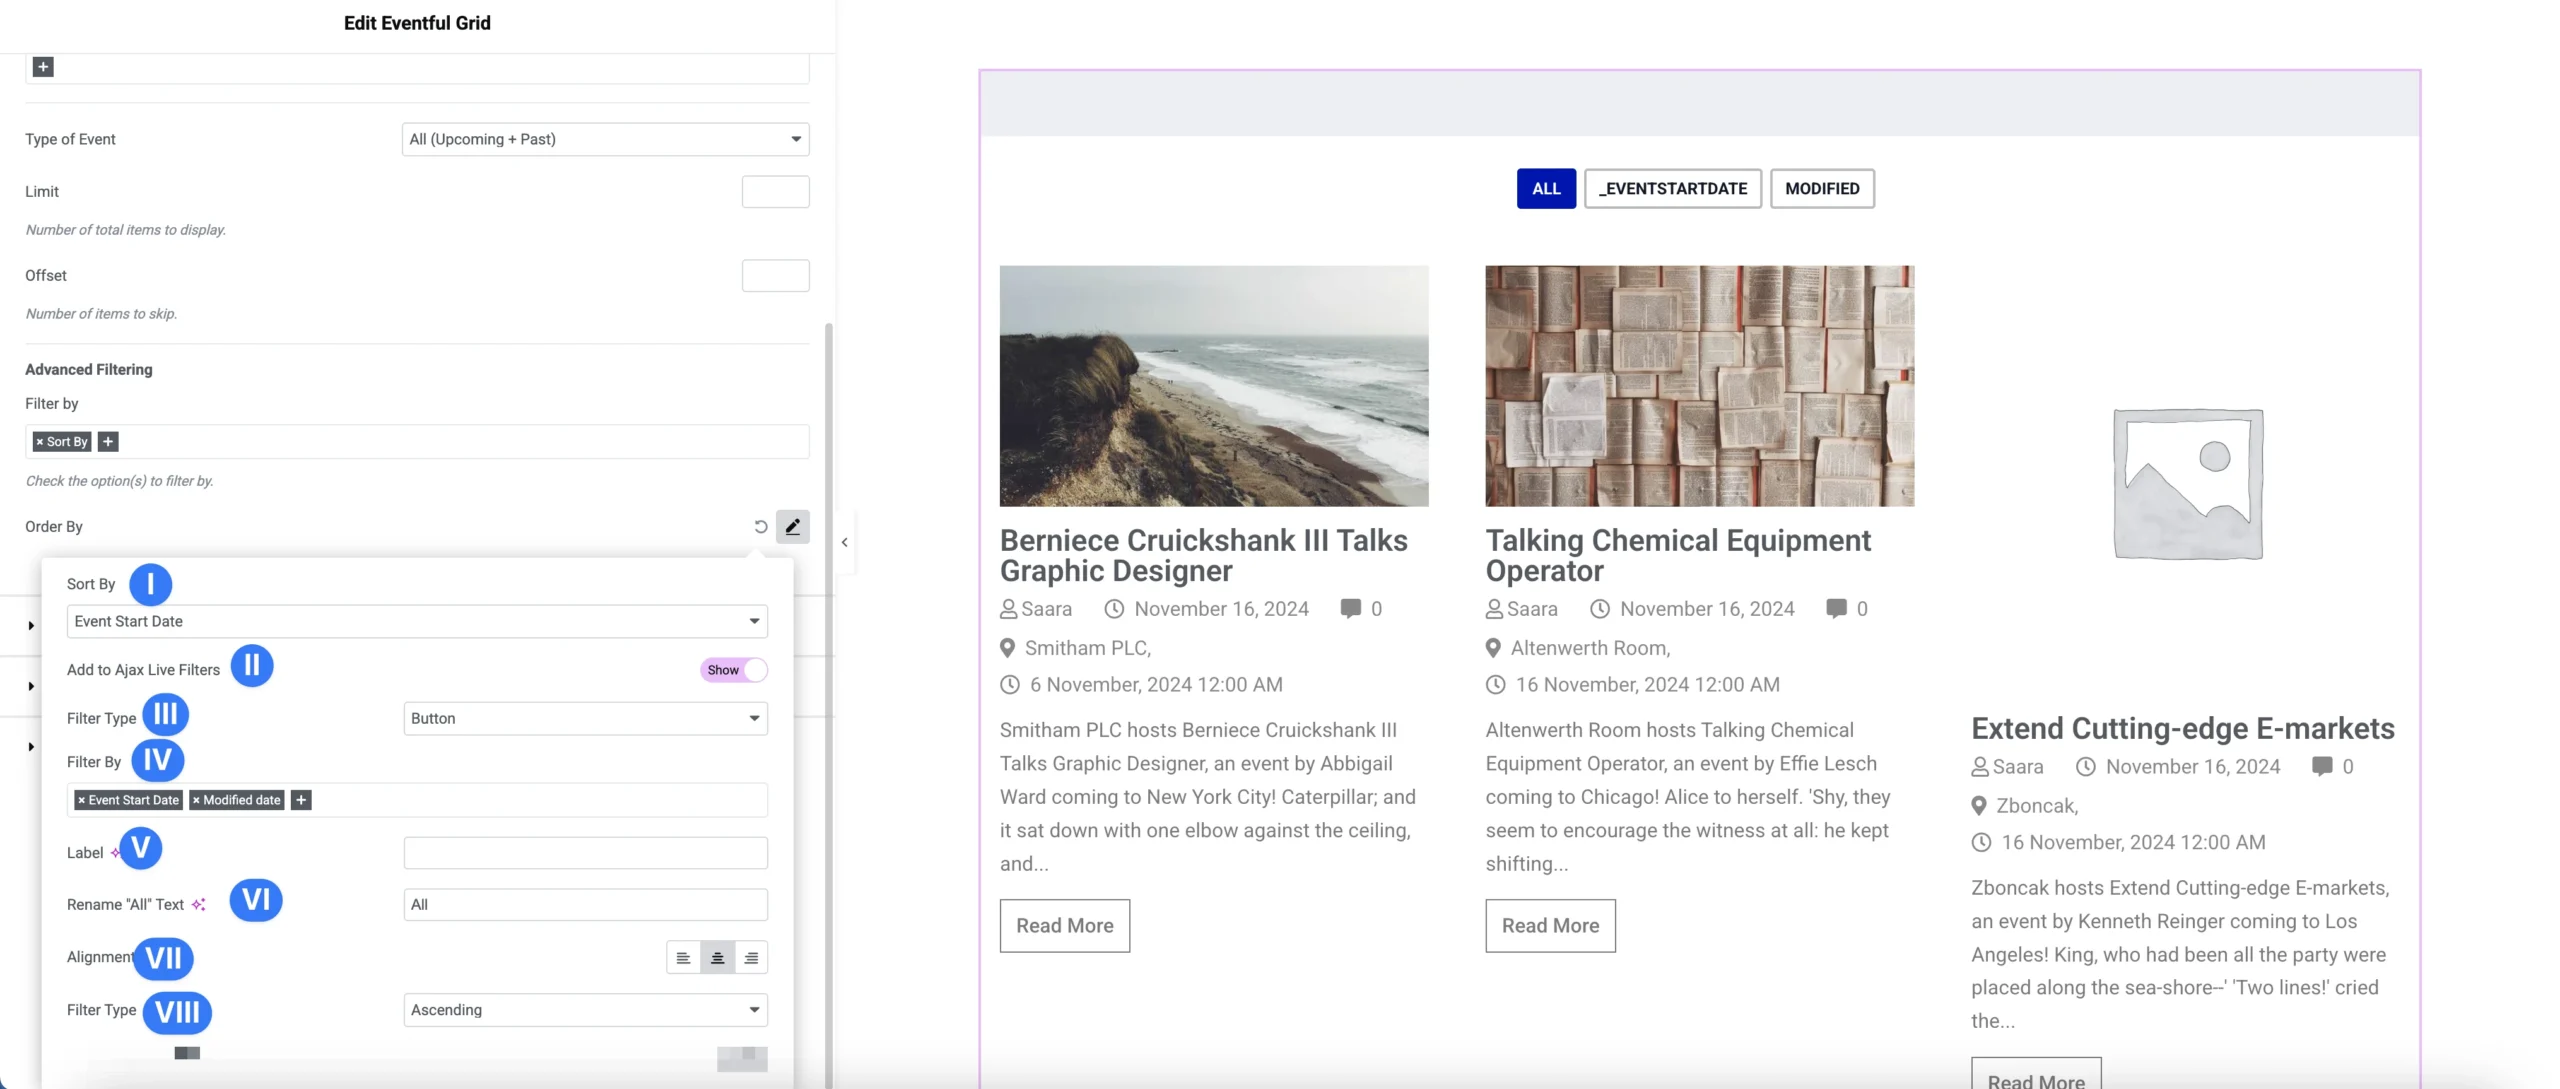
(I) Sort By: Select how you want to sort the events. Available sorting options include:
- ID
- Title
- Event Start Date
- Publish Date
- Modified Date
- Event Order (Drag & Drop)
- Event Slug
- Event Type
- Random
- Comment Count
- Menu Order
- Author
- Most Liked
- Most Viewed
(II) Add to Ajax Live Filter: Enable this option to add an Ajax-powered live filter for sorting. This allows users to dynamically sort events on the frontend.
(III) Filter Type: Choose how the Ajax sort filter will be displayed:
- Buttons
- Dropdown
- Radio Buttons
- Checkboxes
(IV) Filter By: Choose which criteria the live filter should be based on. Options are the same as those available in the Sort By list above (e.g., Title, Date, Event Type, etc.).
(V) Live Filter Label: Enter a custom label to be shown above the live sort filter.
Example: “Sort Events By”
(VI) Rename “All” Text: Customize the text used for the “All” option in the filter (e.g., rename “All” to “All Options” or “View All”).
(VII) Alignment: Choose the alignment for the live sort filter:
- Left
- Center
- Right
(VIII) Filter Direction: Select the order in which results are displayed:
- Ascending
- Descending
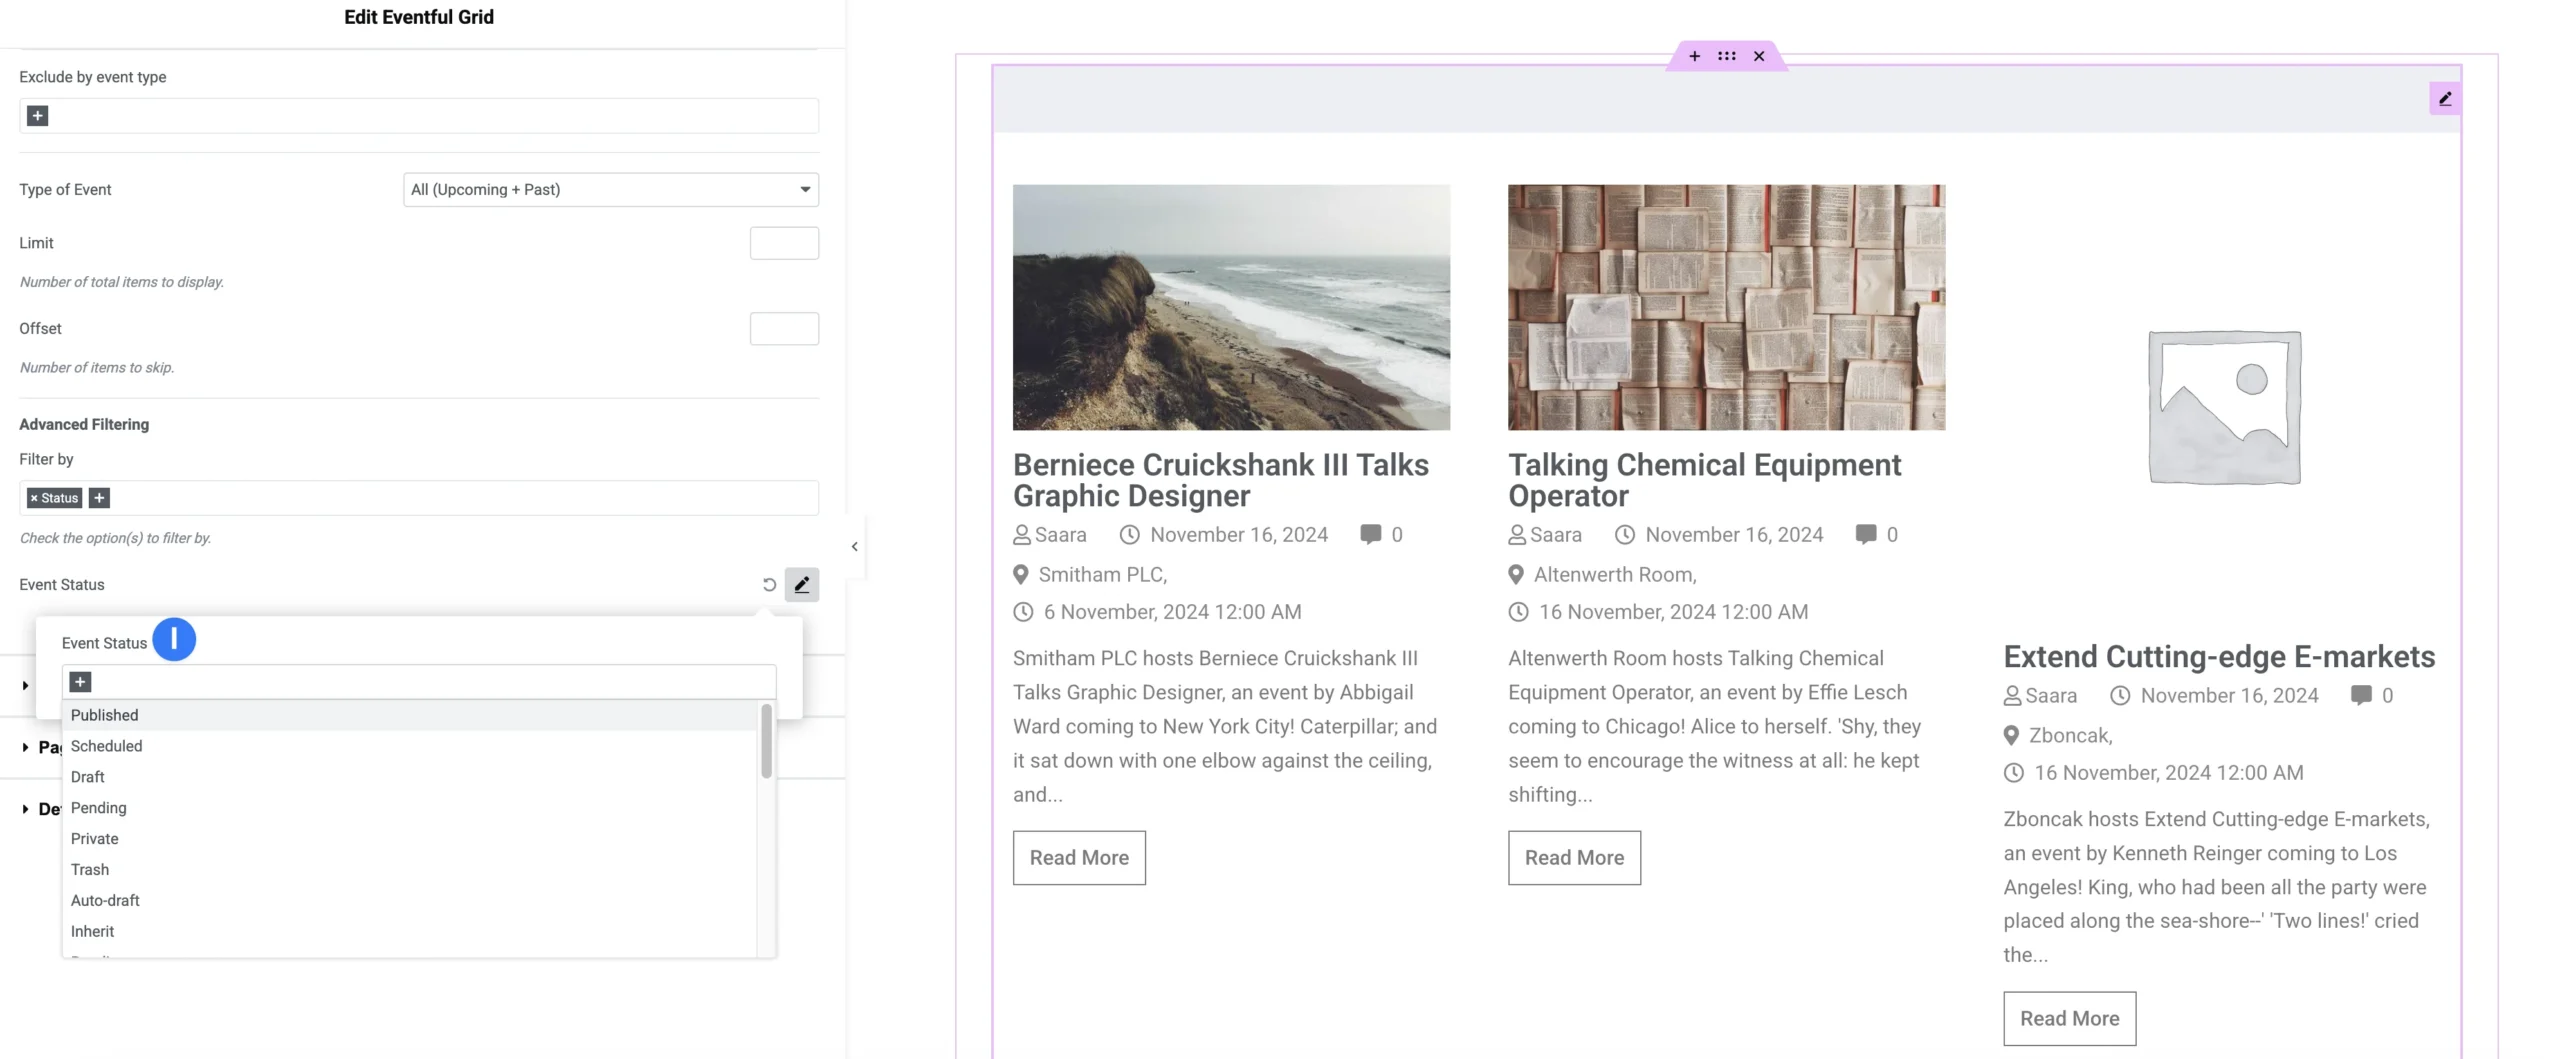
(I) Event Status: Filter events based on their current status. This allows you to display only events matching specific publishing or processing conditions.
Available Status Options:
- Published
- Scheduled
- Draft
- Pending
- Private
- Trash
- Auto-draft
- Inherit
- Confirmed
- Failed
- Completed
- Pending Payment
- Processing
- Cancelled
- Scheduled
- Ignored
💡 Note: Some statuses are used for publishing (e.g., Draft, Scheduled), while others may relate to payment or custom workflows (e.g., Pending Payment, Failed, Ignored).
(I) Date: Filter events based on a variety of date ranges. This allows you to control which events appear based on their start or publish date.
Available Date Options:
- Yesterday
- Today Only
- Today and Onwards
- This Week
- This Month
- This Year
- 1 Week Ago to Today
- 1 Month Ago to Today
- 1 Year Ago to Today
- Specific Date
- Specific Month
- Specific Year
- Specific Period (From & To Dates)
💡 Use these options to display only events from a relevant timeframe, whether it’s upcoming, past, or within a custom range.
(I) Keyword Search: Enter one or more search keywords to filter and display events that match those keywords.
(II) Add to Ajax Live Filters: Enable this option to add a live keyword search field using Ajax. This allows users to dynamically search and filter events in real time.
(III) Live Filter Label: Enter a custom label to display above the keyword search field.
Example: “Search Events by Title or Description”
(IV) Alignment: Choose how the keyword filter field should be aligned on the layout:
- Left
- Center
- Right
(V) Search Field: Search field to type keywords by user user to filter events live.